A good DIY chicken brooder does not need to be fancy. It needs to be warm, dry, draft-conscious, easy to clean, and roomy enough that chicks can move toward heat when they want it and back away when they do not. For most backyard keepers, that means building a simple brooder box from a stock tank, large tote, plywood box, appliance box with upgrades, or another easy-to-sanitize container, then setting it up with secure heat, absorbent bedding, chick-sized feeders and waterers, and enough floor space that the whole thing does not turn into a crowded mess by week two.
The biggest mistake beginners make is building around the box first and the chicks second. A brooder that looks neat in the garage can still fail if the floor is slick, the lamp is shaky, or there is no cooler zone away from the heat source. University extension guidance is fairly consistent on the basics: start chicks around 90 to 95°F at chick level, reduce heat by about 5°F per week, and plan on roughly 1/2 square foot of brooder space per chick through the brooding period.
This guide walks through a practical chick brooder DIY setup for beginner to intermediate keepers who want something affordable, safe, and easy to maintain. You will also find a simple temperature table, a build checklist, and the common mistakes that cause the most trouble in the first few weeks.
What a DIY Chicken Brooder Needs to Do
A DIY brooder for chicks is really a controlled starter space. It should hold warmth where chicks need it, offer enough cooler space so they can self-regulate, keep bedding dry, and let you reach feed and water without turning daily chores into a balancing act. That balance matters more than the exact material you build with.
In practical terms, your brooder box needs five basics: secure walls high enough to contain active chicks, safe heat, non-slip bedding, easy access to feed and water, and enough room to expand as chicks grow. Minnesota Extension notes that chicks need about 1/2 square foot each from day-old to 6 weeks, which is why very small totes and decorative bins get cramped fast. Penn State and Minnesota also note that chick behavior tells you a lot: piling tightly under the heat means they are cold, while staying far from the heat source suggests they are too warm.
A common mistake we see is treating the whole brooder like it should be one uniform temperature. That usually creates overheated chicks, damp bedding, or both. A better setup gives chicks a warm zone and a cooler zone, then lets their behavior guide small adjustments. If you are also planning the next step after brooding, it helps to read ahead on coop ventilation basics so you are not making the move to the coop colder and draftier than it needs to be.
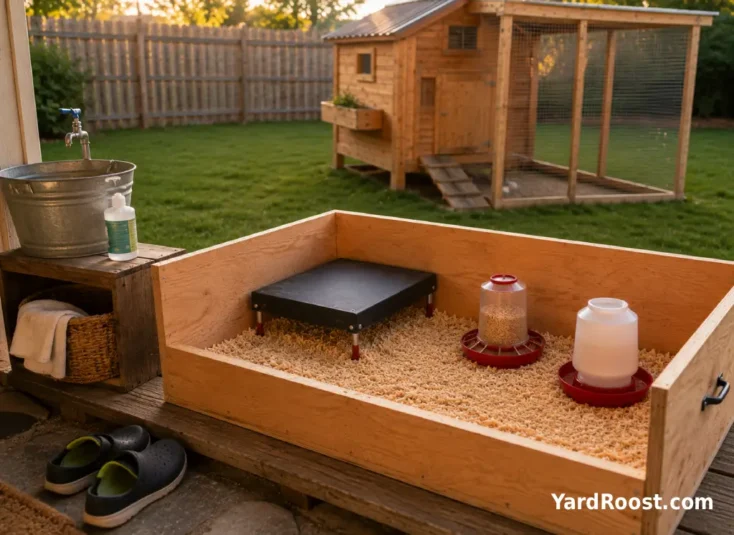
Best Materials for a DIY Chick Brooder Box
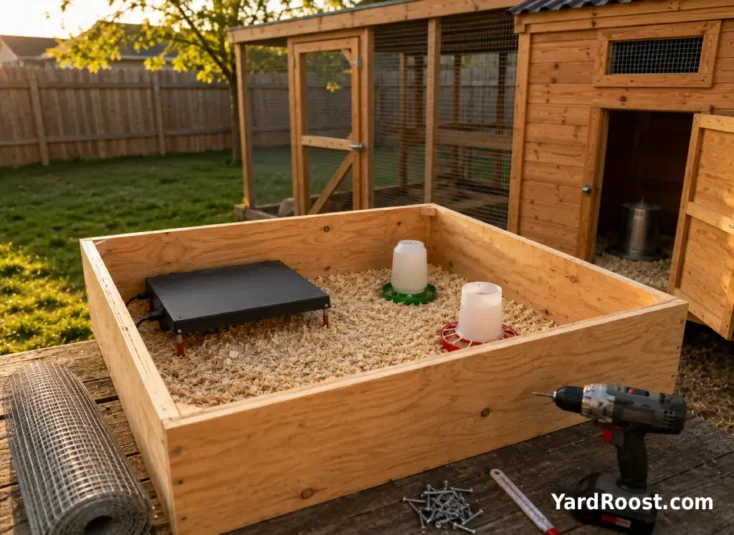
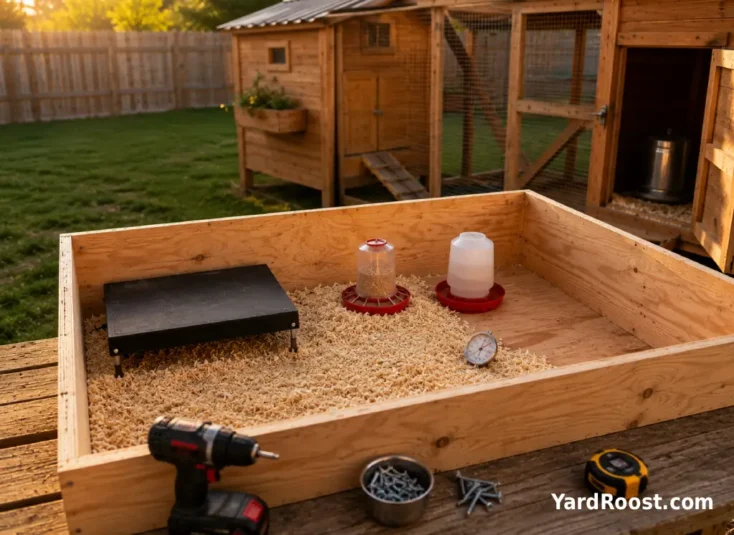
You can make a solid diy brooder box for chicks from several common materials. Plywood works well because it is sturdy, customizable, and less likely to bow under weight. A large stock tank is durable and easy to clean. A heavy-duty plastic tote can work for a very small batch of chicks early on, but it is rarely roomy enough for long. Cardboard is serviceable in a pinch, though it breaks down quickly around water spills and is harder to sanitize between groups.
- Plywood box: best for a reusable chicken brooder diy build, especially if you want a custom size or a hinged lid.
- Stock tank or galvanized tub: durable, easy to scrub, and good for short-term brooding if the footprint is large enough.
- Large plastic tote: acceptable for a handful of chicks at the start, but watch overcrowding and airflow.
- Cardboard appliance box: budget-friendly and fast, but only worth using if you can keep it dry and secure the heat source safely.
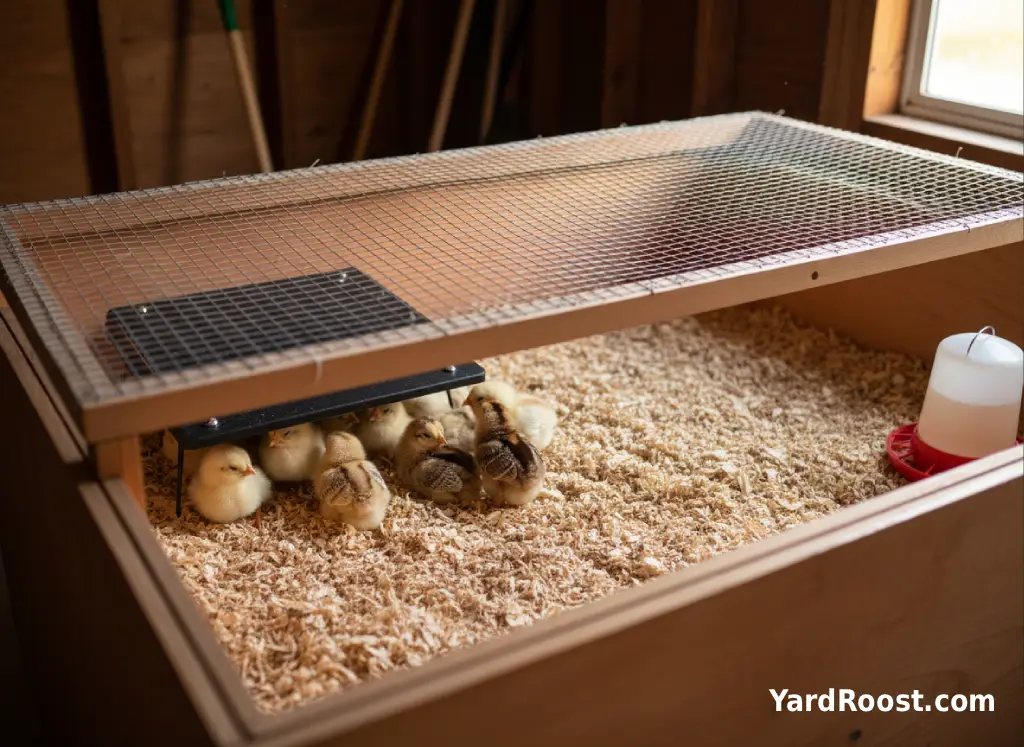
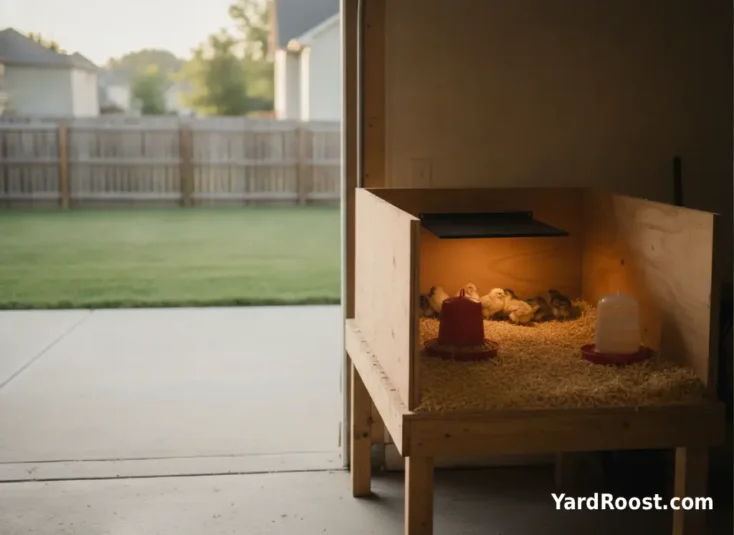
Whatever you choose, prioritize a broad footprint over extra height. Chicks need room to spread out more than they need tall walls. Smooth interior surfaces are easier to clean, and a mesh or hardware-cloth top helps with airflow while keeping pets out. For any brooder using a suspended heat lamp, the heat source must be secured by chain or another non-cord support rather than relying on the electrical cord alone. Minnesota Extension specifically advises using porcelain sockets approved for infrared lamps and supporting them by chain or wire, not the cord.
One more practical note: do not spend all your time on looks. A plain brooder box with stable heat and dry bedding will outperform a prettier setup that is crowded or awkward to clean.
How Big Your DIY Brooder for Chicks Should Be
Size is where many diy chicken brooder builds go wrong. People often start with the container they already own, then try to fit the chicks into it. The better approach is to count the chicks first and size the brooder around them. A useful baseline from Minnesota Extension is about 1/2 square foot per chick from day-old through the brooding phase.
That means:
| Number of Chicks | Minimum Brooder Floor Space | Practical Example |
|---|---|---|
| 6 chicks | 3 sq ft | About 2 ft x 1.5 ft minimum, though larger is easier to manage |
| 10 chicks | 5 sq ft | About 30 in x 24 in minimum, but a wider box works better |
| 15 chicks | 7.5 sq ft | About 36 in x 30 in minimum |
| 20 chicks | 10 sq ft | About 48 in x 30 in minimum |
Those numbers are a floor, not a comfort target. A bigger brooder is usually easier to keep clean and less likely to trigger pecking, damp litter, and spilled water. A common mistake we see is underestimating how much feeder space and walking room chicks need by week two. If your diy chick brooder box seems roomy on arrival day, that is usually a good sign.
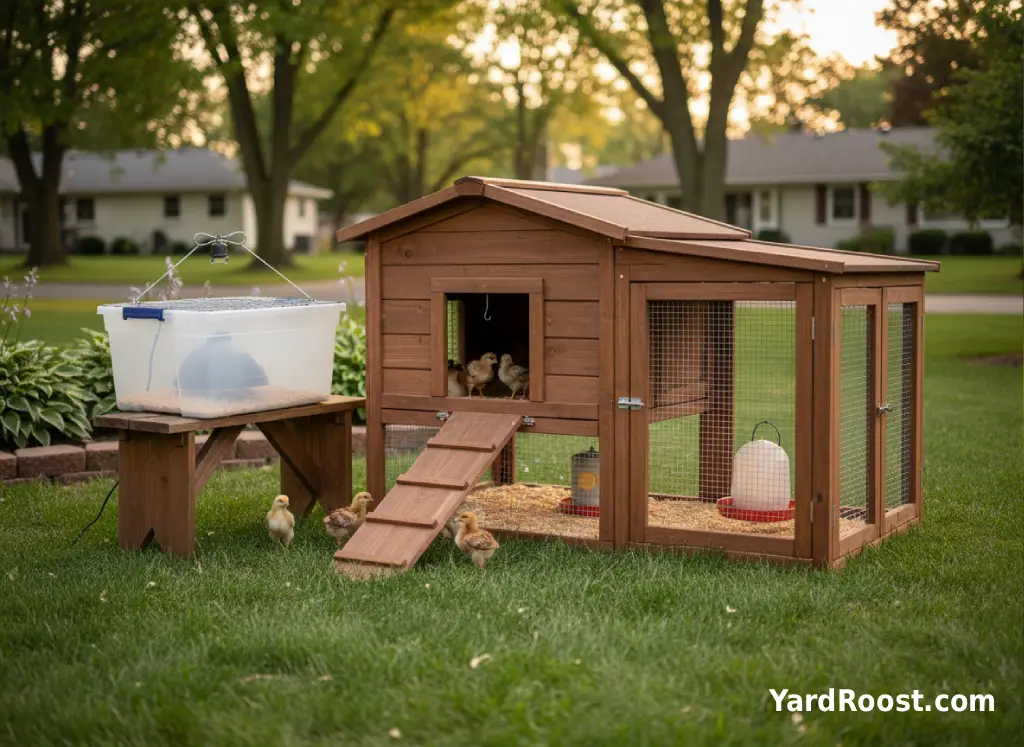
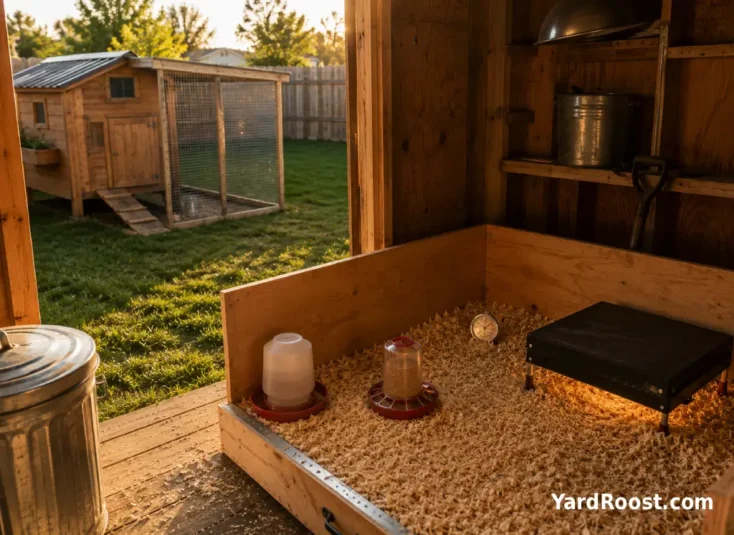
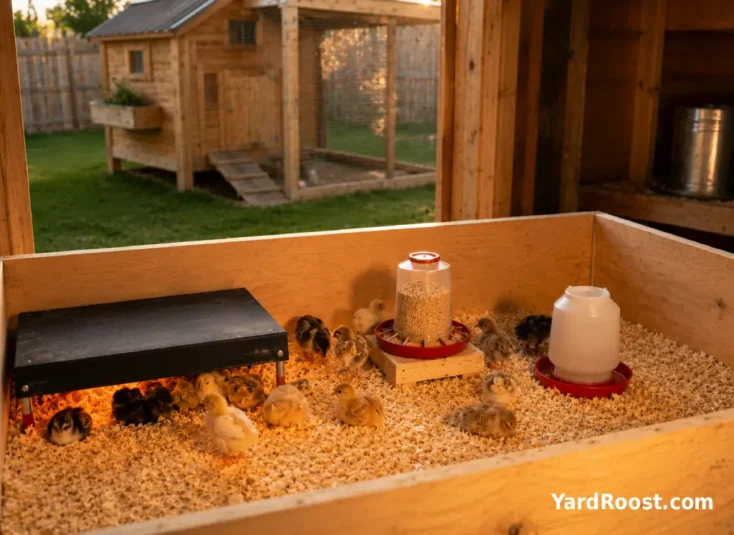
For layout, keep the heat source to one side, not the middle. Put feed and water where chicks can reach them without standing directly under the heat all day. That simple layout makes your brooder more forgiving because chicks can choose the spot that feels right instead of being trapped in one temperature zone.
Safe Heat Setup and Brooder Temperature by Week
Heat matters more than almost any other part of a diy chicken brooder box. Penn State and Minnesota guidance lines up closely here: start chicks at about 90 to 95°F for the first week at chick level, then reduce the temperature by roughly 5°F each week until they are fully feathered or no longer need supplemental heat.
| Chick Age | Target Warm-Zone Temperature |
|---|---|
| Week 1 | 90–95°F |
| Week 2 | 85–90°F |
| Week 3 | 80–85°F |
| Week 4 | 75–80°F |
| Week 5 | 70–75°F |
You do not need to heat every inch of the brooder to those numbers. Measure in the warm zone at chick level, then let the rest of the brooder stay cooler. Watch behavior every day. Chicks piled tightly and peeping loudly are telling you they are cold. Chicks hugging the walls and avoiding the heat source are telling you the warm side is too hot.
For small flocks, many keepers now prefer a brooder plate because it creates a more natural warm shelter and lowers some fire-risk concerns compared with heat lamps. If you do use a lamp, secure it with hardware that cannot slip, use a porcelain fixture rated for the bulb, and keep it supported independently from the cord. Minnesota Extension also notes a lamp should be no closer than 15 inches to the litter when using that style of setup.
A common mistake we see is making big temperature changes based on one thermometer check. Make small adjustments, then use both the thermometer and the chicks’ behavior before changing it again.
How to Build a Simple DIY Brooder Box for Chicks
You can build a very workable diy chick brooder in one afternoon. The goal is not custom cabinetry. The goal is a sturdy, easy-clean space that supports the chicks for the first several weeks.
- Choose a box with enough floor space. Use the 1/2 square foot per chick rule as your baseline, then go larger if you can. Wider is usually better than taller.
- Add absorbent, non-slip bedding. A 2- to 4-inch layer of wood shavings is a practical starting depth, and Minnesota Extension lists 2 to 4 inches of wood shavings, straw, or other litter after cleaning and drying the space. Avoid slick surfaces. Penn State specifically warns against brooding young birds on newspaper or wood floors because poor traction can lead to leg problems.
- Install heat on one side. Set up a brooder plate or a securely mounted lamp so chicks can move toward warmth or away from it.
- Place feed and water where they stay clean. Keep them out of the hottest zone and far enough apart that one spill does not soak everything. Utah State guidance notes about 1 linear inch of feeder space per chick as a useful rule of thumb.
- Add a breathable lid if needed. This matters once chicks begin hopping and fluttering. Hardware cloth or another sturdy mesh works better than a sealed cover because it protects without trapping stale air.
A common mistake we see is setting everything at floor level and never changing it. As chicks grow, raise the feeder and waterer slightly so they stay cleaner, but keep them low enough that chicks can still reach them easily. You will save yourself a surprising amount of mess with that one change.
Daily Brooder Care That Keeps Chicks Dry and Settled
The best diy brooder for chicks is the one you can maintain without skipping steps. Daily care is mostly simple, but it needs consistency. Check temperature, chick behavior, feed level, water cleanliness, and bedding moisture every day. Damp corners and wet shavings around the waterer are the first places trouble starts.
Most keepers do better with quick checks twice a day than with one big cleanup. In the morning, make sure the warm zone still feels right and that all chicks are active. In the evening, top off feed, refresh water, and remove the worst wet spots before they spread. Small corrections keep a diy chicken brooder box from turning sour.
This is also where rhythm matters. If chicks are constantly sleeping in the feeder tray, knocking over the water, or packing into one corner, the setup is telling you something. You may need a larger brooder, a steadier heat gradient, or a different waterer style. A common mistake we see is blaming the chicks when the layout is the actual problem.
As the chicks feather out, your daily job shifts from supplying enough warmth to avoiding overcrowding and stale bedding. When the brooder starts looking busy even right after a cleaning, that is your cue to enlarge the space, divide the group, or start planning the move to their next setup.
Common Mistakes to Avoid With a Chicken Brooder DIY Build
Most brooder problems start with a few repeat mistakes, and the fix is usually straightforward once you spot them.
- Too little floor space: chicks get crowded, dirty, and restless faster than new keepers expect. Build larger than your minimum whenever possible.
- Slick flooring: newspaper and other slippery surfaces can contribute to leg issues. Use absorbent bedding with traction instead.
- Heat centered over the whole brooder: chicks need a warm zone and a cooler zone, not wall-to-wall heat.
- Unsecured heat lamp: cords are not supports. Use safe mounting hardware and a rated fixture if you use a lamp.
- Waterer placed where bedding gets soaked: a constantly wet brooder is harder to keep warm and clean.
A common mistake we see is trying to solve every problem by adding more heat. If chicks are loud, crowded, or messy, the real cause might be crowding, drafts, wet litter, or poor feeder and water placement. Heat is only one part of the system.
Cleaning, Hygiene, and Biosecurity Around Baby Chicks
Baby chicks can carry germs that make people sick even when the birds look perfectly healthy. CDC guidance for backyard poultry is clear on the basics: wash hands with soap and water after handling chicks or anything in their area, supervise children closely, keep poultry supplies outside the house, and do not let children younger than 5 handle chicks.
For a home brooder, that means setting up habits from day one. Keep a pair of brooder or coop shoes that stay out of the living area. Clean feeders and waterers outside when possible. Do not snuggle chicks, kiss them, or eat and drink while handling them. Those are small routines, but they make a real difference in reducing Salmonella risk.
If you are reusing a diy chick brooder box for a new batch later, empty all bedding, scrub away visible debris, wash the box and equipment thoroughly, let everything dry, and then reset with fresh bedding. Minnesota Extension recommends cleaning and disinfecting the house and equipment before starting chicks and allowing the space to dry and air out before adding litter.
Good hygiene in the brooder also makes later flock management easier. The same mindset carries over when you start thinking about quarantine for new chickens and longer-term flock biosecurity.
When to Get Professional Help
A diy brooder for chicks should make normal monitoring easier, but it does not replace professional care when something is clearly off. Contact an avian vet or a qualified poultry professional if chicks are repeatedly piling despite correct temperatures, staying weak or unresponsive, breathing with obvious distress, refusing feed or water, or developing ongoing diarrhea, severe pasting, injuries, or sudden losses in the group.
This is one place to stay disciplined about what you can and cannot solve at home. Safe first steps are basic ones: check brooder temperature at chick level, correct slick or wet bedding, make sure clean water is available, and separate an obviously struggling chick so it is not trampled. Avoid guessing at medications or home treatments. If the problem does not improve quickly or several chicks are affected, bring in professional help.
A common mistake we see is waiting too long because the brooder looks warm enough from across the room. Close observation matters. If the chicks’ behavior and appearance are telling you something is wrong, treat that as useful information, not background noise.
A solid diy chicken brooder is less about woodworking skill and more about getting the basics right: enough floor space, a safe heat source, good footing, dry bedding, clean water, and a layout that lets chicks choose comfort instead of being forced into one hot or cold spot. If you build around those needs, even a simple homemade brooder can work extremely well.
For most backyard keepers, the sweet spot is a brooder box that is bigger than it first seems necessary, heated from one side, and easy to clean in under a few minutes each day. That setup gives you room to adjust as chicks grow and makes the first weeks less stressful for both you and the birds. It also keeps you from chasing the same preventable problems over and over, especially wet litter, crowding, and temperature swings.
If you remember only a few numbers, make them these: start around 90 to 95°F in the warm zone, reduce heat by about 5°F each week, and plan on roughly 1/2 square foot per chick through the brooding period. Then let chick behavior help fine-tune the setup. Those basics are well supported by extension guidance and, more importantly, they work in real backyard brooder builds.